Hello everybody, brothers and sisters whereever you are.
In last post i have write something about Hair coloring tutorial, shading and lighting Paint tool SAI (Mouse user), and then in this post we will jump to the next step.
We will talk about Face and Eye coloring tutorial Paint tool SAI (Mouse user), so this post will explain how to drawing eye and some face shading.
This tutorial is just a basic tutorial, you can improve it with your own skill. I just shown you what should we do for get better result.
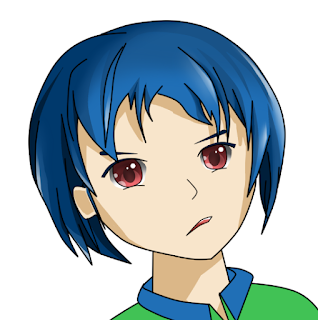
And here is the result for this part of tutorial, just less than 1 hour to done this part. Yeah this is simplest part but important.
Oke.. just start from our last work.
First, go to our face coloring layer and make a cliping layer over it.

And then with darker color, i use CTRL+U trick to done this color pick.

Feel where the light coming, and the shade should be on opposite way.
Do it for all hair section, and done. In this art i do not use blur, because i want make a 2D art, if you need more life or realistic just use blur to do it.

And also, go to neck base color then create a clipping layer over it. Do some shading with same color as face shade.

The result of this face and neck shading should be like the picture below.

And now we go to eye coloring.
Create dark color on the top part. I usually use pen to full coloring and then erasing it using eraser tool to make base color that lighter to shown.

For the pupil, use darker color than it shade. I use pen tool in click.

It will be weird too see a circle pupil in 2D style, so i do CTRL+T and transform it to make an oval.

Some rotate ro getting fit with eye potition.

And then select using select tool, CTRL+C tehn CTRL+V.
This will make a copy of our pupil, and then drag to the right eye, and do CTRL+T for some transform and rotate.
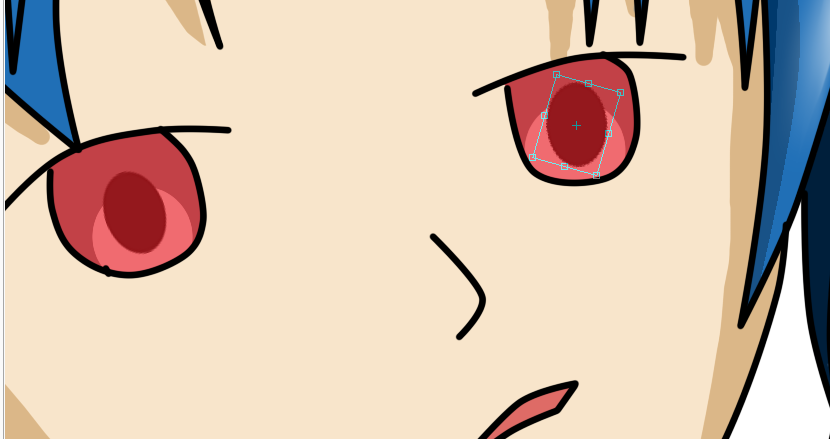
We still need a darker side in the eye, so make a clipping layer with a black color.

Black color is created by using pen tool and eraser tool.

To give a shading sensation, just set the mode of that dark layer to multiply.

And then by using CTRL+U, you can set the right color. Just play on brightness, cause it in multiply mode.

To make a good view, use blur tool to make gradation in dark side.

I think the pupil color do not enough dark, so i use CTRL+U and play with all bars to customize the color.

And then for last touch, create a new layer in eye color clipping, set it to the top most and draw using brush tool with dark color of the eye.
Some brush and done.

And last we should put the lighting side in the eye, you can use brush tool to make a soft light or pen tool to make a sharp light.

Light side have done for some seconds.

And now for white side of eye.
Create a new layer below the base color of eye.
Use pen tool with white color to create this white area.

And with clipping layer on white color, use black color to make shade.

Some blur...

For a better color, as usual, use CTRL+U to do it. And play with brightness.

And then we should make a eyelashes.
By using a linework layer and curve tool, make some line for this eyelashes.

Select it using magic wand and put color using bucket in new layer.
I use a color that picked from dark color in the eye.

And then we do something with the mouth.
I often get some trouble with the potition, so think it more.

Some drags in linework layer.

Make a white color for teeth.
And a darker color for tongue.

And now we do something with the ear. Just go to the layer that we have done before to coloring.

What?? i think have put the color before, where it go?
Oh.. this is just because we draw the hair over the ear.

So by pressing CTRL and click on the ear layer to a selection.

And then go to the hair base color for erasing the overlap color.

And now,, just create a new clipping layer and do some shade.

And then we have done with this part of tutorial, here is the result.

Thanks for viewing this tutorial about face and eye coloring using mouse, hope you like this. For some of my progress about this project, you can see on the link below.
See you agan in next post.. ^^
Egoistic Boy project:
2. Line art
0 comments:
Post a Comment